The single most reliable predictor of renovation regret is not the budget, the contractor, or the tile choice. It is the order in which decisions were made.
This is a claim that surprises most homeowners, because renovation planning tends to start with the things that are easiest to imagine: the tile, the vanity, the faucet finish. Those are the visible, shoppable parts. They are also, in terms of decision sequence, almost the last things that should be chosen. When a homeowner selects a twelve-by-twenty-four-inch floor tile before the drain location is fixed, they have made a layout decision with a tile selection. When they choose a vanity before confirming rough-in dimensions, they have made a plumbing decision with a furniture purchase. When they pick a mirror before the lighting plan exists, they are working backward through a chain of dependencies that does not run that direction.
Every decision in a bathroom remodel has dependencies. Some decisions lock others in. Some create irreversible constraints. The sequence in which they should be made is not a matter of preference or project management style. It is a function of how the room is actually built, and what each decision requires of the decisions that follow.
Why Sequence Matters More Than Budget
The popular framing of renovation risk puts budget at the center. Run out of money, the logic goes, and you run out of options. That framing is not wrong, but it is incomplete. A project that runs over budget because of scope changes made in the right order is a different situation from a project that runs over budget because early finish selections created structural conflicts that required rework.
The mechanism is simple. Construction has dependencies. Tile is installed on a waterproofing system. A waterproofing system is installed on a substrate. A substrate is installed on a structure. A structure sits on a floor plan with fixed dimensions and clearances. Each layer depends on the one below it. When decisions are made out of this order, the downstream layers have to absorb the conflict, and they absorb it at cost.
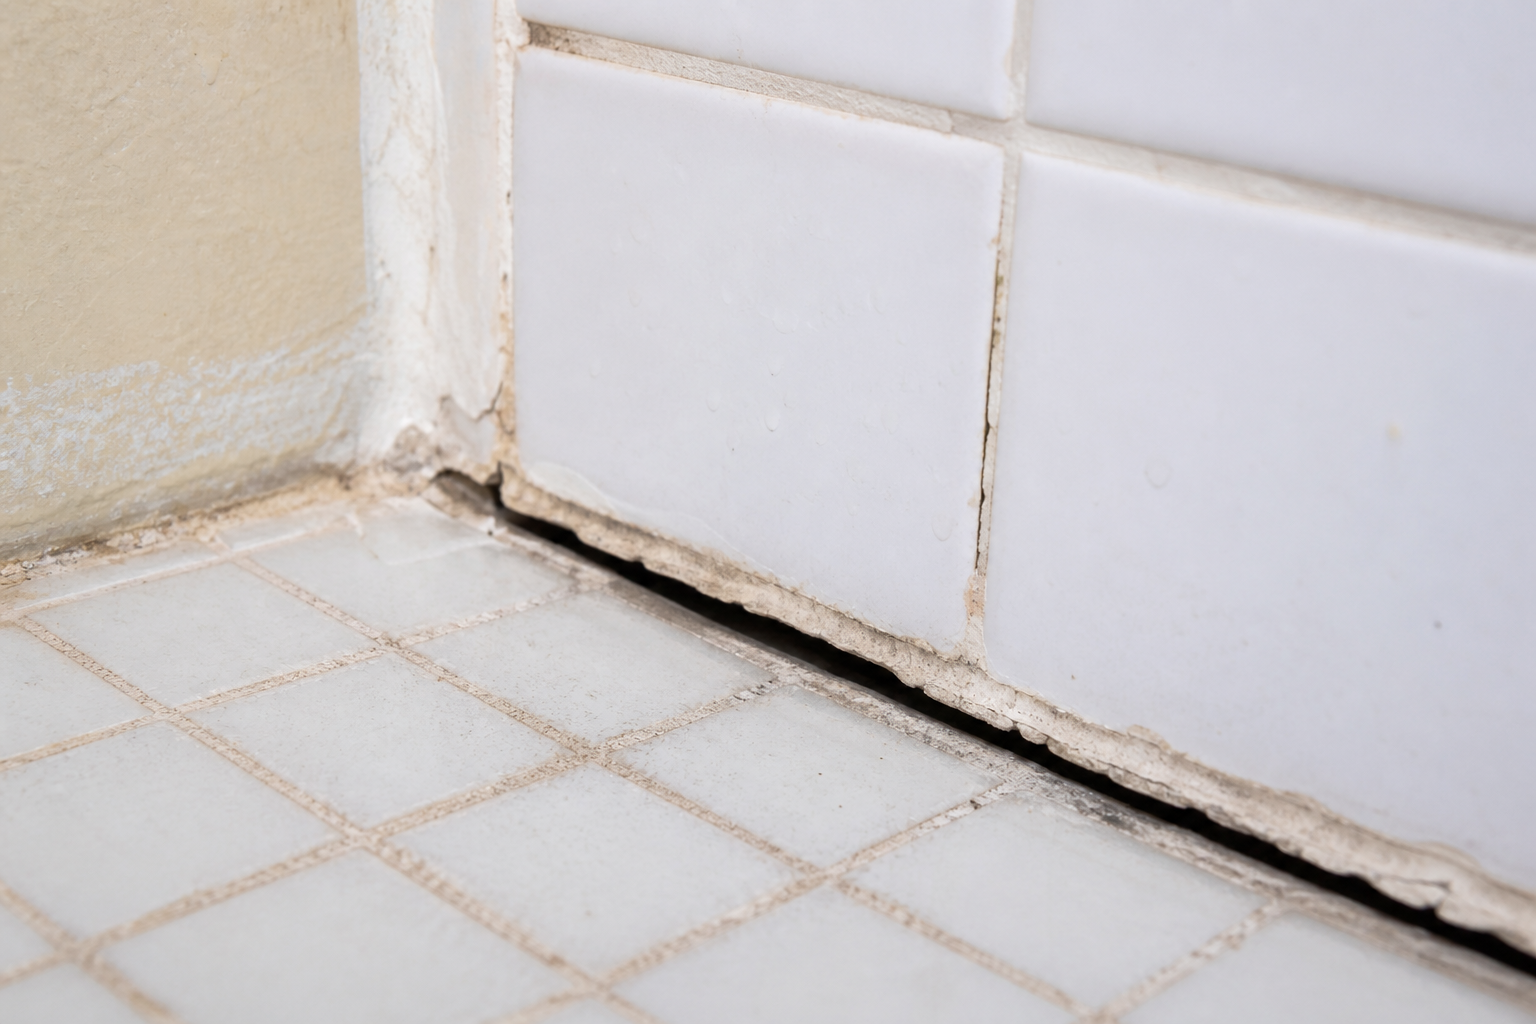
A concrete example: a homeowner selects a four-inch hexagonal mosaic floor tile early in the design process. It is beautiful, and it anchors the whole room's palette. The problem emerges during rough plumbing, when the drain location is confirmed. The drain sits at a position that creates a cut layout in the hexagonal tile that the tile installer describes as unacceptable. The fix requires moving the drain -- which requires modifying a concrete slab or re-routing a below-floor drain stack, depending on the framing type -- or compromising the tile layout in a way that will be visible every day. This conflict was not caused by a bad tile choice. It was caused by making a tile choice before the drain location was fixed.
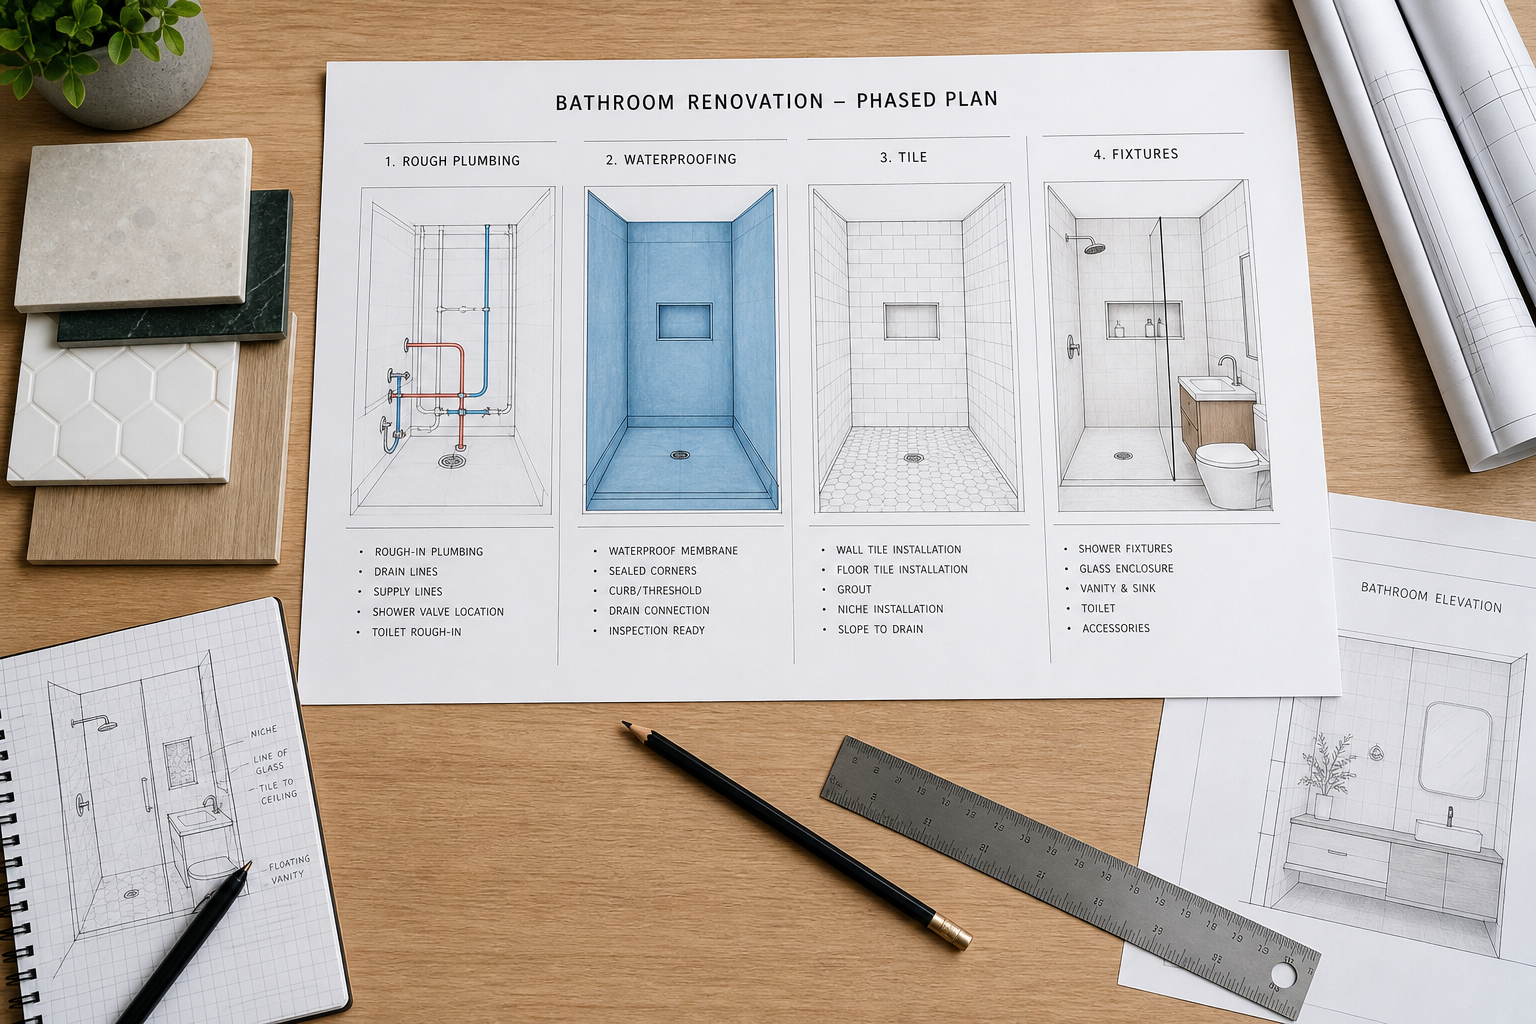
The Correct Sequence, and What Each Step Locks In
There is a working order for bathroom decisions. It is not a decoration checklist. It is a dependency chain, and each step either enables or constrains every step that follows.
Step 1: Layout and Clearances
Layout comes first because everything else depends on it. Where the toilet sits determines the rough-in dimension, which determines which vanity configurations can work. Where the shower opening faces determines the control valve location, which determines the glass panel position, which determines the electrical rough-in requirements. How much floor space exists between the shower and the vanity determines whether the door can swing or must slide, whether there is enough clearance to pass a person without turning sideways.
The IRC and most local codes specify minimum clearances for bathroom fixtures: a minimum of eighteen inches from the centerline of a toilet to any obstruction, a minimum of twenty-one inches of clear floor space in front of a toilet, a minimum of thirty inches of clear floor space in front of a shower or tub opening. These are minimums, not targets. A bathroom laid out to minimums will function but will not feel generous or comfortable in daily use.
Layout also determines what is structurally possible. If the existing drain is in the wrong location for the ideal layout, that is a conflict between a plan and a concrete slab or a floor system, and it needs to be identified -- and costed -- at the planning stage. Finding it after tile is ordered turns a design problem into a budget emergency.
Step 2: Structural and Waterproofing System
The second decision is the waterproofing assembly: what system will be used, where it terminates, how niches or benches or curbs integrate with it, and what the drainage plane relationship is between the membrane and the drain.
This decision has to precede tile selection because different waterproofing systems have different substrate requirements and different compatible tile setting materials. A foam tile-ready shower system like Schluter's Kerdi-Board system requires different setting materials than a traditional mud-bed float with sheet membrane. The membrane-to-drain connection is system-specific. Using the wrong setting material over a waterproofing membrane voids both the membrane warranty and the installation.
The structural check that comes with this step is the subfloor. If the floor system has inadequate stiffness for the proposed tile format -- specifically, if it exceeds the L/360 deflection limit that the TCNA specifies for tile installations -- the tile will crack regardless of product quality. Fixing the floor after tile is installed means removing the tile. Fixing it before means adding blocking or sister joists before any finish work begins, at a fraction of the cost.
This is also the moment to confirm the ventilation path. The exhaust fan duct route needs to be known before walls close, because changing it afterward requires opening those walls. A duct that terminates in an attic instead of outdoors is a code violation and a long-term mold pathway. The time to fix that routing is before framing is enclosed.
Step 3: Plumbing and Electrical Rough-In
Once layout and waterproofing system are fixed, the rough-in trades can set positions. The plumber sets the drain, the supply lines, and the valve rough-in location. The electrician sets outlet locations, the GFCI circuit, the exhaust fan rough-in, and the lighting circuit rough-ins.
These positions will be inspected by the building department before walls close. Changes after inspection require re-inspection. Changes after drywall require opening walls.
What makes the rough-in step critical for finish planning is that it locks in the dimensions the finish selections have to match. The valve rough-in height determines where the showerhead and controls will land, which determines whether a standard trim kit or a custom trim kit is needed. The supply line locations at the vanity wall determine which vanity configurations are compatible. Every finish selection made before rough-in is speculative. Every finish selection made after rough-in is confirmable.
Step 4: Tile Format and Floor Pattern
Tile is selected after the drain location is confirmed and the layout is fixed, because both of those things directly govern the tile layout. The floor drain position determines where a large-format tile layout will have cuts and where the field can run uninterrupted. The dimensions of the shower floor determine what tile sizes will produce a balanced layout.
The practical question is: where will the cut tiles land, and will they be acceptable? In a twelve-by-twelve tile floor with a centered drain, the layout can often be symmetric and the cuts predictable. In a twenty-four-by-forty-eight large format tile floor, the drain position determines whether field tiles run cleanly or whether a cut of three inches lands directly in front of the vanity. That cut cannot be improved by any grout color selection. It is a layout problem, and it was created by choosing a tile format before confirming the drain.
Shower wall tile format has its own dependencies. Larger tiles require flatter walls. A thirty-six-by-forty-eight shower wall field in a wall that is not perfectly plumb will reveal the variance in joint widths in a way that a four-by-twelve subway tile installation will not. That problem is easier to solve before tile is ordered than after.
Step 5: Fixtures and Fittings
Fixtures are specified after tile format is known because proportion matters, and proportion depends on the visual field the tile creates. A wide-format wall tile in a large-format field calls for a different scale of fixture trim than a two-by-four subway tile. A mosaic floor with tight grout lines reads differently against a brushed versus polished fixture finish. These relationships are easier to evaluate when the tile is already selected.
More concretely: the shower valve trim plate must fit within the tile field or span a grout joint in a controlled way. Knowing the tile layout before specifying the trim plate means the plumber can set the valve rough-in at a position where the trim lands within a single tile or at a predictable joint. Specifying the trim plate without knowing the tile layout is guessing at a dimension that will be visible every day.
Vanity fixtures have their own dependencies: supply line compatibility with the selected cabinet, drain configuration compatibility with the selected sink, and the relationship between the sink depth and the countertop overhang. These are confirmable once tile, vanity, and rough-in are all known, and speculative otherwise.
Step 6: Lighting
Lighting is decided while rough-in is still accessible, because the decision has two parts: the circuit routing and the fixture specification. Getting one without the other creates problems in both directions.
The lighting plan for a bathroom needs to address three separate tasks: ambient illumination, task lighting at the vanity, and any accent or niche lighting. Task lighting at the vanity is the most consequential decision for daily use. Overhead lighting alone produces shadows on the face at the mirror, which is why vanity sconces placed at the sides of a mirror produce better results: the light comes from directions that minimize the shadows overhead fixtures create.
In practice, most bathroom lighting decisions are deferred until the room looks like a room -- by which time the walls are closed and the rough-in positions are fixed. If the rough-in was placed without a lighting plan, the fixture locations may be wrong, the circuit may not be sized correctly, or the dimmer compatibility may not work with the specified fixture type. Correcting lighting after rough-in is possible but always costs more than planning it before.
Step 7: Hardware and Accessories
Hardware and accessories -- towel bars, toilet paper holders, robe hooks, cabinet pulls, mirror clips -- are last because they depend on everything else. They are chosen to harmonize with the fixture finish, the tile palette, the grout color, and the visual weight of the room. They are also the easiest decisions to change if something is wrong, which is the right characteristic for a decision made last.
The installation sequencing for accessories is equally late: they are mounted after tile is set, paint is applied, and fixtures are in place. Mounting them earlier means they may need to be removed and remounted, and in a tiled wall, remounting anything requires a careful repair rather than a simple patch.
The Cost of Reversal: Three Patterns That Repeat
The most common pattern of renovation regret follows a specific path: a homeowner shops for finishes first, builds emotional attachment to a tile or vanity before the structural decisions are made, and then encounters constraints that cannot accommodate the selection they love.
In that situation, the homeowner faces a choice between redesigning the structural elements to accommodate the finish selection (expensive, and possibly structurally wrong), accepting a compromise in the finish execution (visible every day), or starting the selection process over (emotionally difficult and time-consuming). None of those options were necessary if the decisions had been made in order. The cost is not always financial. Sometimes it is the quiet sense that the room is almost right, that the cut tile near the shower entrance was the thing nobody flagged until it was permanent.
The most pervasive reversal is the fixture-before-rough-in problem. A homeowner orders a freestanding tub based on a showroom visit. The tub requires a floor-mounted filler faucet with supply lines stubbed up through the floor at a specific location. The plumber has already roughed in the supply lines at the wall. Moving floor supply lines in a slab foundation costs between three and eight thousand dollars depending on depth and accessibility. Moving them in a wood-framed floor is less expensive but still requires opening the subfloor, re-routing runs, and patching. This happens when the product selection precedes the rough-in conversation instead of informing it.
The second reversal is lighting. Homeowners regularly select a vanity mirror with integrated lighting after the rough-in is complete, only to find that the rough-in placed a junction box at the wrong height or in the wrong wall location for the fixture they have chosen. A mirror-integrated light requires the junction box centered on the mirror. Sconces flanking a mirror require two separate rough-ins at a specific height -- typically sixty to sixty-five inches above finished floor. If the rough-in placed one box at a different location, the fix is a wall repair and a new stub. Not catastrophic. But entirely preventable, and the patch will be visible in raking light for the life of the room.
The third reversal is tile before layout, the pattern described above. It is common enough that experienced tile installers recognize it immediately. The tell is the homeowner who arrives at the pre-construction meeting with the tile already purchased and sometimes already delivered. The designer then has to find a drain location that produces a workable layout with the chosen format. Sometimes that is possible. Sometimes it produces a sliver cut in a prominent location that cannot be resolved without returning the tile. The tile was not a bad choice. It was a premature choice, made before the information that would have made it a confirmed choice was available.
What all three patterns share is a decision made at the wrong stage because the visible, emotionally satisfying part of renovation planning -- choosing things -- feels like progress, while the invisible, structural part -- confirming dependencies -- does not feel like anything at all. It happens before construction starts, in spreadsheets and showroom visits and late-night browsing, and it produces constraints that the builders will work around and the homeowner will pay for.
How We Run the Sequence
Our design process runs in a fixed order: layout and clearances first, then waterproofing and structural decisions, then trade rough-ins, then tile format, then fixtures, then lighting, then hardware and accessories. We do not let a tile selection drive a layout decision; we let a layout decision drive a tile selection. We do not allow a vanity purchase to precede confirmed rough-in dimensions, because a vanity that arrives on-site and does not fit the confirmed supply line spacing is not a plumbing problem -- it is a planning problem, and it belongs in our planning phase, not in the client's living room while the bathroom is demolished.