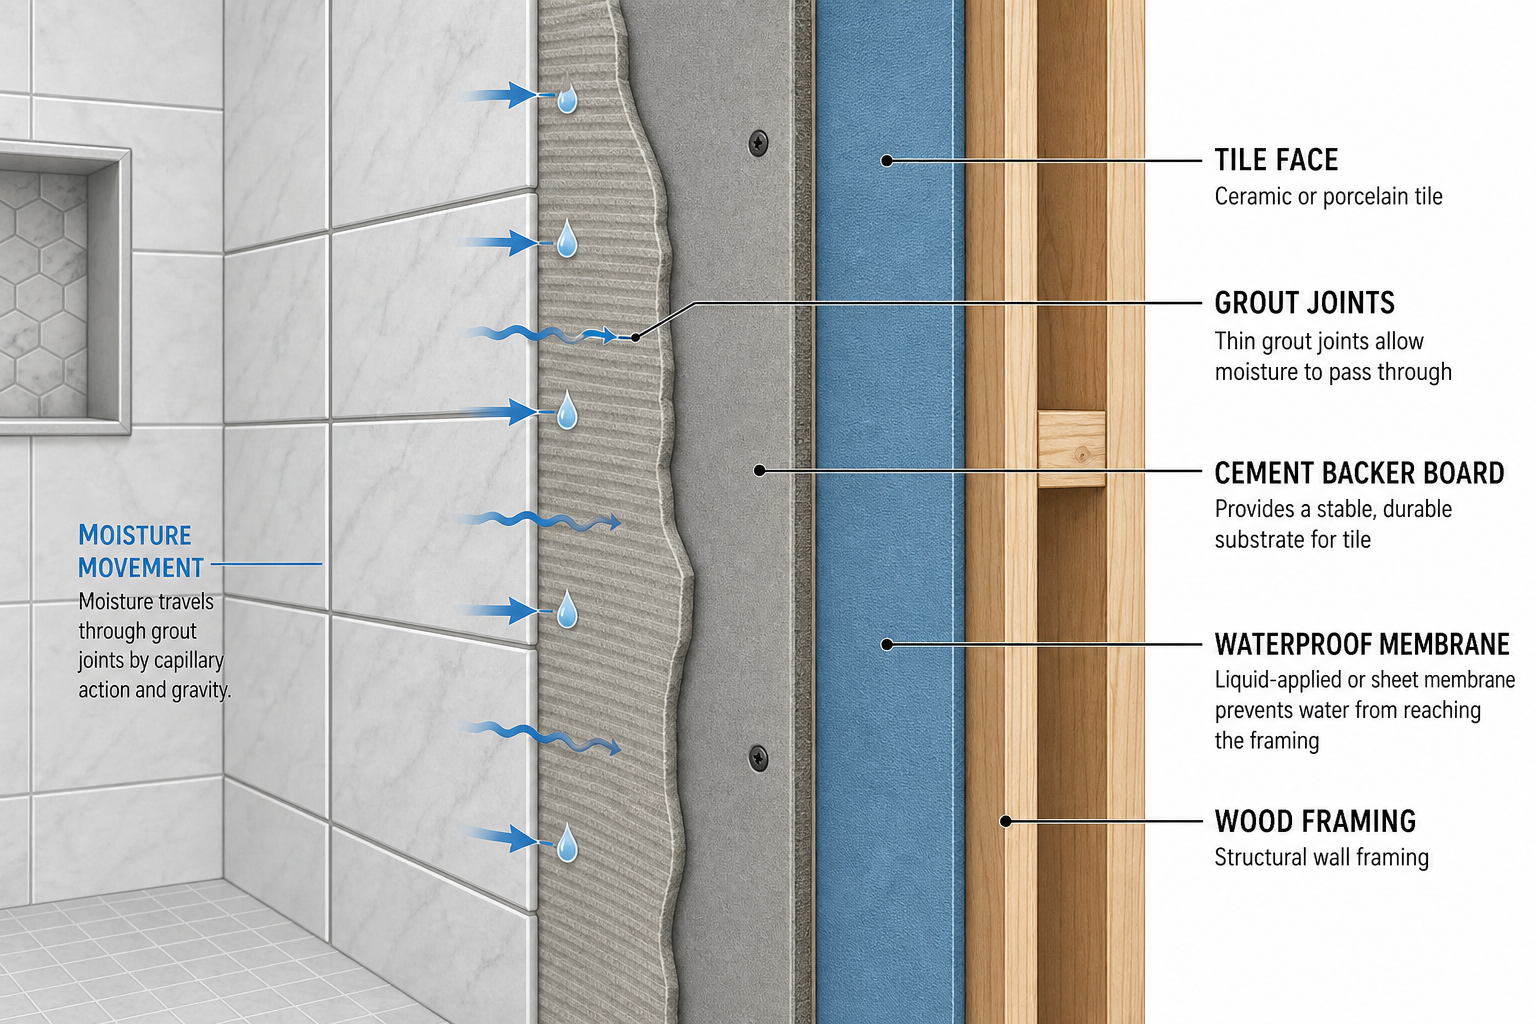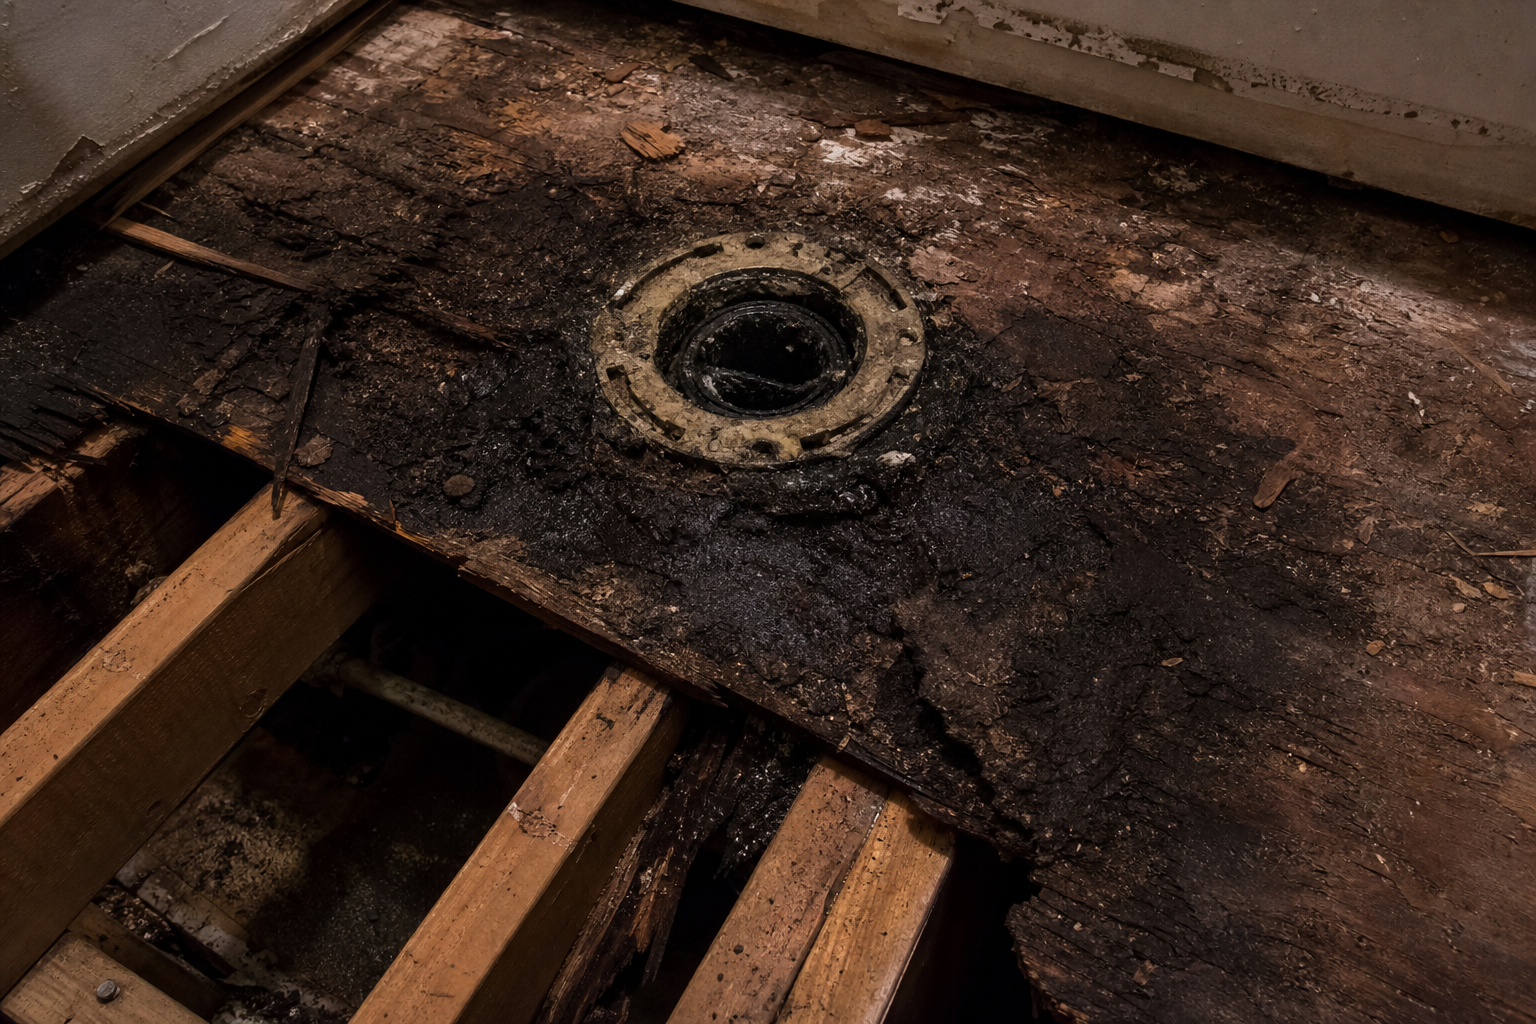
Bathroom subfloor rot is not random bad luck. It starts at one of three predictable locations and follows a predictable timeline. The toilet flange leaks slowly for years before the floor feels soft. The shower base fails at the liner-to-drain connection and saturates the plywood below. The tub edge caulk fails and water tracks under the skirt. All three are preventable at installation. None are visible until the damage is already structural.
That pattern is not a construction industry observation. It is what contractors find repeatedly when they gut a bathroom that was "updated" ten or fifteen years ago by someone who installed new tile over an old substrate without assessing what was below. The surface looked acceptable. The floor below it did not. The rot was already there, already structural, already in the joists in some cases, before anyone pulled up the tile.
Understanding why requires understanding something counterintuitive: a bathroom floor can fail for years without any dramatic signal. There is no flood, no visible moisture, no mold on the wall. There is just a slow, invisible accumulation of water below the surface, at one of three locations that never quite dry out the way other parts of the building do.
The Toilet Flange: The Leak Nobody Notices
The wax ring at the toilet base is the only thing separating the sewer connection from the subfloor below it. It is also a product most homeowners have never thought about and most contractors inspect only when a toilet rocks or smells.
The wax ring is a passive seal. When it is installed correctly on a stable floor with a properly positioned flange, it compresses to form a watertight connection between the toilet horn and the drain pipe. It stays there. When the floor moves, the seal degrades. When the toilet rocks, even slightly, the wax deforms unevenly. The movement that causes a toilet to rock is exactly the movement that eventually breaks the seal: repeated loading and unloading by someone sitting down and standing up, day after day, year after year.
The leak that results is almost invisible for a long time. It is not a continuous drip that pools on the floor around the base of the toilet. It is water from the flush cycle that finds its way around the compromised seal and saturates the subfloor below the flange during each use. That water has nowhere to go and no good way to dry. The plywood below the toilet is permanently wet, then permanently damp, then soft, then decomposed. The cycle from first compromise to structural damage can take three to eight years, depending on how frequently the toilet is used and how stable the floor was to begin with.
YPD Services, a licensed plumbing contractor, documents this failure mode in their technical guidance on wax ring maintenance: a slow leak from a bad wax ring can saturate subfloors and walls over time, and by the time the floor feels spongy or the toilet begins to shift noticeably, water has typically been tracking into the subfloor for a significant period. The spongy floor is not the beginning of the problem. It is the end of the concealed phase.
Preventing this at installation requires two things: a properly positioned flange height and a stable subfloor around the flange opening. The flange should sit at or just above the finished floor level. If it sits too low after new tile is installed, the wax ring has to span a larger gap, which reduces the compression that forms the seal. Oatey, which manufactures toilet sealing products, explicitly warns against stacking two wax rings to compensate for a low flange; stacking creates uneven compression and a seal that is more likely to fail under normal movement. The correct solution is a flange extender that raises the seating surface to finished floor level before the toilet is set.
A stable subfloor means adequate blocking around the flange opening so the floor does not flex when the toilet is loaded. In older construction, the area around the toilet flange is sometimes the softest part of the floor because that is exactly where previous leaks have been silently working. When a bathroom is opened for renovation, probing the subfloor in that zone is the first thing that should happen before any new material goes down.
The Shower Pan: The Failure at the Drain Connection
The shower pan, whether a traditional mortar bed with a CPE liner or a more recent bonded membrane system, is designed to collect any water that passes through or around the tile and channel it to the drain. The liner does not stop water from getting in; it stops water from getting further. When the liner fails, water that would have reached the drain instead reaches the subfloor below the shower assembly.
The most consistent failure location in a liner-based shower system is the connection between the liner and the drain body. That connection requires the liner to be clamped between the top and bottom sections of a two-piece drain, with the clamping bolts creating a watertight seal around the liner material. If those bolts are not torqued correctly, or if the liner was not trimmed and positioned correctly before clamping, or if the liner was later penetrated by a fastener driven through the curb or backer board, the connection fails. Water that enters the mortar bed from above through the tile and grout reaches the liner, runs downhill to the drain connection, and exits the system through the failed seal into the subfloor below.
The damage pattern in this failure is different from the toilet flange scenario. The water does not concentrate directly below the drain. It distributes across the plywood beneath the mortar bed at the level of the liner, which means the rot can extend across the entire shower footprint before it becomes structurally obvious. A large shower with a failed liner may have two or three square feet of heavily damaged plywood and a wider area of moisture-compromised material by the time anyone notices.
Bonded membrane systems avoid the liner-to-drain clamping connection as a failure point by using a drain that integrates directly with the membrane material. The membrane bonds to the drain flange with compatible adhesive, and the connection is continuous rather than mechanical. This is a meaningful improvement in reliability, but it introduces a different failure mode: the bond can fail at the drain flange if the substrate was not properly prepared, if the bond coat was applied unevenly, or if the drain body moved slightly during installation before the adhesive cured. The failure looks different from a liner failure, but the consequence is the same: water that should reach the drain instead reaches the plywood.
Prevention at installation requires confirming the membrane or liner is continuous before tile covers it. For traditional liner systems, flood-testing the pan before the mortar bed goes down is the standard practice: water is allowed to stand in the liner for 24 hours to verify that no leakage occurs before the assembly is buried. That test is not optional; it is the only way to verify continuity before the evidence is inaccessible. For bonded membrane systems, visual inspection at every drain-to-membrane transition, corner, and penetration serves the same function.
The Tub Edge: The Slow Caulk Failure
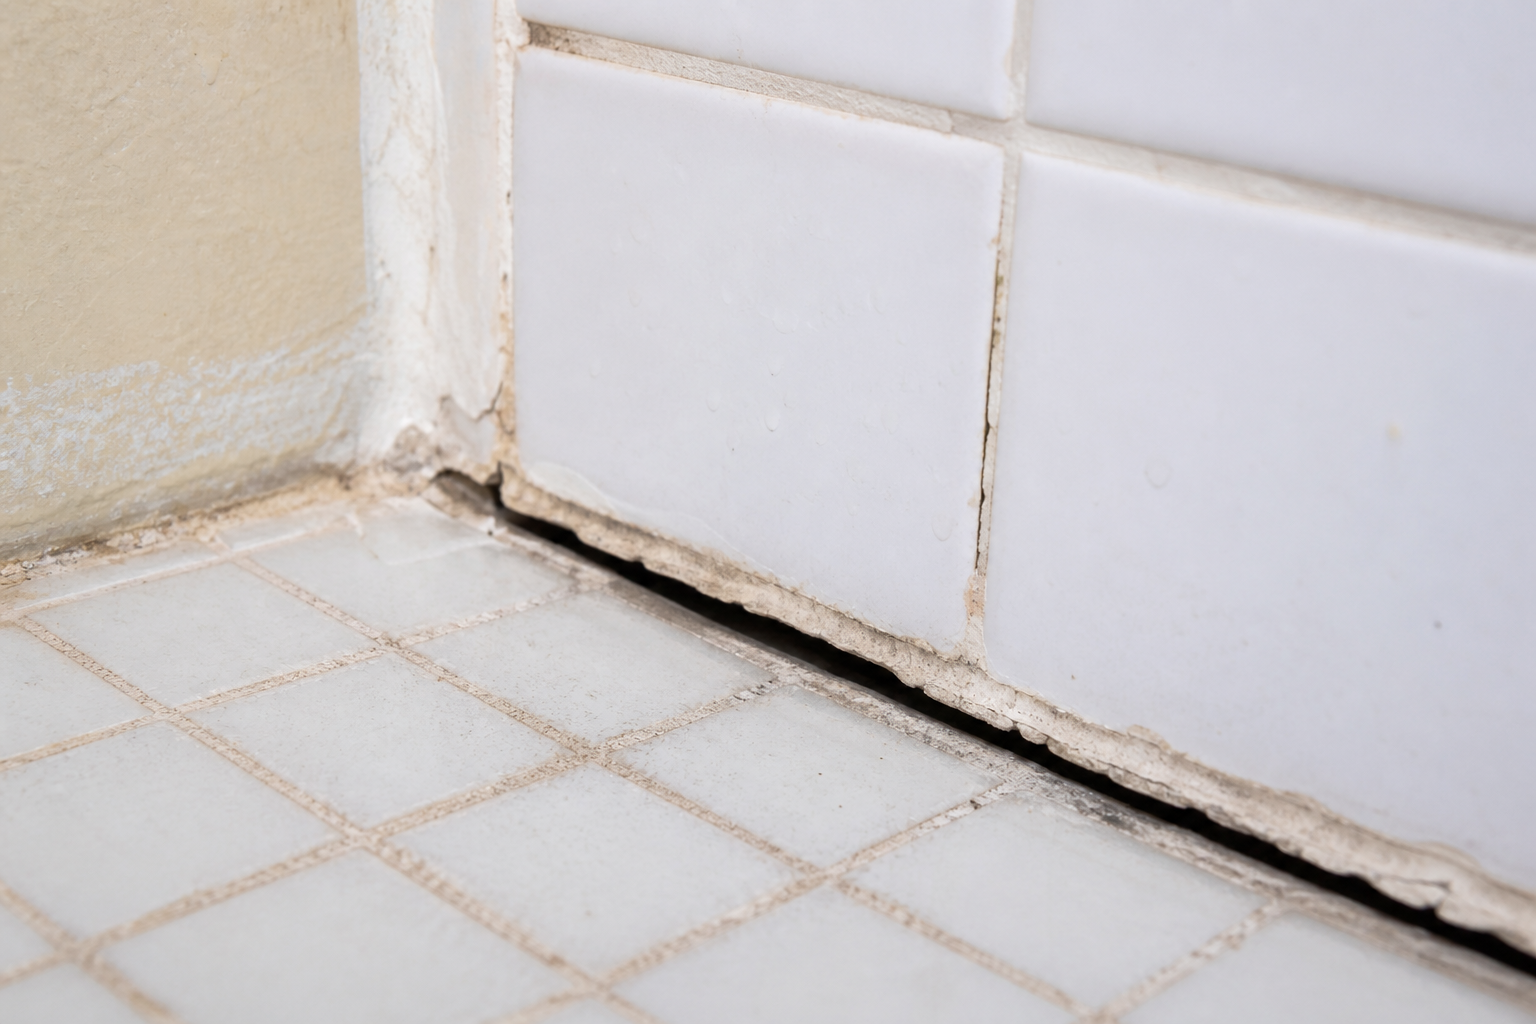
The tub-wall interface is one of the most common locations for bathroom water damage, and it is also one of the most consistently misrepaired locations in renovation history. The joint where a bathtub deck meets the surrounding tile is a change-of-plane joint between two materials that move differently. The tub flexes under load. The tile does not. The caulk joint between them has to absorb that differential movement while remaining watertight.
When the caulk at the tub edge fails, which is a matter of when and not if for any silicone caulk older than a decade, water enters the joint during bathing or showering. That water does not find a waterproofed substrate on the other side of the joint. It finds a gap between the tile flange of the tub and the floor tile below, which leads directly to the subfloor. The water does not travel down the outside of the tub where anyone would see it. It travels inward, under the tub skirt, and saturates the plywood in a zone that is inaccessible without removing the tub.
The practical result is that tub-adjacent subfloor rot is often discovered during full bathroom gut remodels in which the tub is removed for the first time in fifteen or twenty years. The area directly under the tub edge, particularly at the corners where two planes of tile meet and caulk coverage is thinnest, is commonly rotted to the point of structural compromise. The plywood has softened or crumbled. In some cases the rot has extended to the rim joists below.
Preventing this at installation requires two decisions. First, the tub-to-tile joint should be filled with a high-quality, movement-grade silicone specifically formulated for the thermal cycling and moisture exposure in a wet area. Second, the joint should be maintained: the caulk has a finite lifespan and should be replaced when it begins to crack, shrink away from the tile edge, or allow visible moisture penetration. A bathroom that receives a fresh caulk line every eight to twelve years rarely develops catastrophic tub-edge subfloor damage. A bathroom in which the original caulk from twenty years ago is still in place almost always does.
Why Renovation Is the Opportunity to Fix All Three
A bathroom renovation that does not include a full subfloor assessment is a renovation that may be installing new finish materials over existing structural damage. The damage does not advertise itself. Tile that was installed over rotted plywood looks exactly like tile installed over sound plywood until someone probes the substrate or pulls the tile to look.
The consequence of installing new tile over compromised plywood is not simply that the damage continues. Compromised plywood flexes. Flexible substrate cracks grout and eventually dislodges tile. The new finish work fails faster than it should have because it was built on a foundation that was already failing. The renovation that was supposed to solve the bathroom problem has now accelerated it.
Assessment means probing the subfloor at all three locations before any new material is specified: at the toilet flange, at the shower base perimeter and drain connection, and at the tub edge. Probing means physically pressing on the floor with a tool to check for softness, checking for discoloration or staining in the plywood, and using a moisture meter if there is any question about whether a damp area is active or historical. If the plywood is soft, it comes out. If it is dry and sound, it stays.
The decision to replace compromised subfloor is not expensive relative to the renovation as a whole. A section of 3/4-inch plywood cut to fill an area around the toilet flange costs a fraction of a tile installation. Blocking between the joists to support the patch is labor, not material cost. Done during an open gut remodel, subfloor repair adds a day or two to the project timeline in most cases. Done as a separate repair after the tile has been installed and the damage has progressed further, the same work requires removing the tile, rebuilding the floor, and reinstalling the finish work. The math on doing it right the first time is not close.
Every bathroom gut remodel we do includes a subfloor assessment before any new material is installed. We probe the areas around the toilet flange, shower base, and tub edge before deciding whether to patch or replace.